How-To: Black-Out Switch
Simplifying the redundant stock wiring harness on my CB500T was absolutely necessary in my mind when I started planning out my build. I ditched the stock handle bar switches and replaced them with 2 toggles to control power to the lights and coil seperately. Here’s a basic overview of the light switch… a lo/kill/hi switch. Besides being able to black-out my lights / run from the cops switch, it also comes in handy to conserve battery power while adjusting the timing or having to start the bike on a low battery.
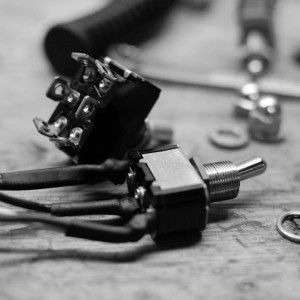
1. Double Pole Double Throw (DPDT) switch. I bought mine from McMaster-Carr. The switch has 6 poles and 3 switch positions (ON-OFF-ON). For comparison, the wired switch, pictured below, is a Single Pole Double Throw (SPDT) which has 3 poles and can only switch 1 circuit.

2. The DPDT switch has the functionality to switch 2 circiuts which is what I needed.
Circuit #1: low beam – OFF – high beam.
Circuit #2: tail/gauge lights – OFF – tail/gauge lights.
Here is the switch wired up. The black wire (1 to 2 wire) is hot when the ignition is on and feeds both poles. So to explain, the first ON position turns on the low beam and tail/gauge lights and the second ON position turns on the high beam and tail/gauge lights.

3. Switch mounted in my gauge bracket. The wires are heat wrapped and run into the headlight bucket.

4. My slimmed down wiring diagram so you can see how the switches connect into the rest of the wiring. (color version)

8 responses to “How-To: Black-Out Switch”
Leave a Reply
You must be logged in to post a comment.
Random
Blast
From Past
Published - Sep 27, 2011
Livin’ it up on the road south
Been living free camping in the woods, riding great open roads and lovin’ every bit of it. Smoky mountains were an epic sight to see. Saw 5 black bear all within 20 feet of us. Weekend traffic through the park got to be too much so we decided to high tail it south for some […]
dig it… might have to do the same to the 650 since we’re gonna go through the wiring.
-ed
Great idea and super cleanly done – I can dig it! Now to find a three position switch that works into contemporary styling…
great post, been wondering how your simplification was actually done.
What did you do about your turn signals?
Hey Trace, I am not running turn signals.
What did you do with the yellow and yellow/white wires coming out of the right hand control? Also Do I need a switch for the tail light wire or can I bypass it by removing it from the switch cluster?
Really, nice work.
I’m going to do something similar on mine.
How did you manage to get the ignition key switch to sit so low? It usually potrudes to be flush with the dummy lights console.
Is there any chance you could send a copy of the coloured diagram, as the link no longer displays it, many Thanks
Richard