Replace Yamaha 2 stroke crank seals
Since a lot of friends have been getting 70’s and 80’s Yamaha 2 stroke dirt bikes, and I’ve done this a couple times now on my CT1-175 due to the motor blowing up, I figured I’d do a basic write up on how to change the crank seals.
First off… Why do you care and what’s the deal?
On 2 stroke dirt bikes, there is a rubber seal on either side of the crankshaft. Over time these dry out.
The seal on the magneto side (left side) prevents air from getting into the combustion chamber. If the seal on this side goes bad, you’ll get air leaks. Your idle will hang and/or the bike will rev erratic randomly. Bike will run lean and trying to tune it will be pointless.
The seal on the clutch side (right side) prevents crankcase oil from getting into the combustion chamber. If the seal on this side goes bad, you’ll burn a ton of oil and eventually foul plugs and suck the crankcase dry of oil.
Ok.
Things you’ll need to change the crank seal which you most likely do not have or own:
– air compressor set up and air gun to loosen certain bolts for the first time in 30 years
– 26mm / 29mm / 30mm socket
– yamaha magneto puller tool
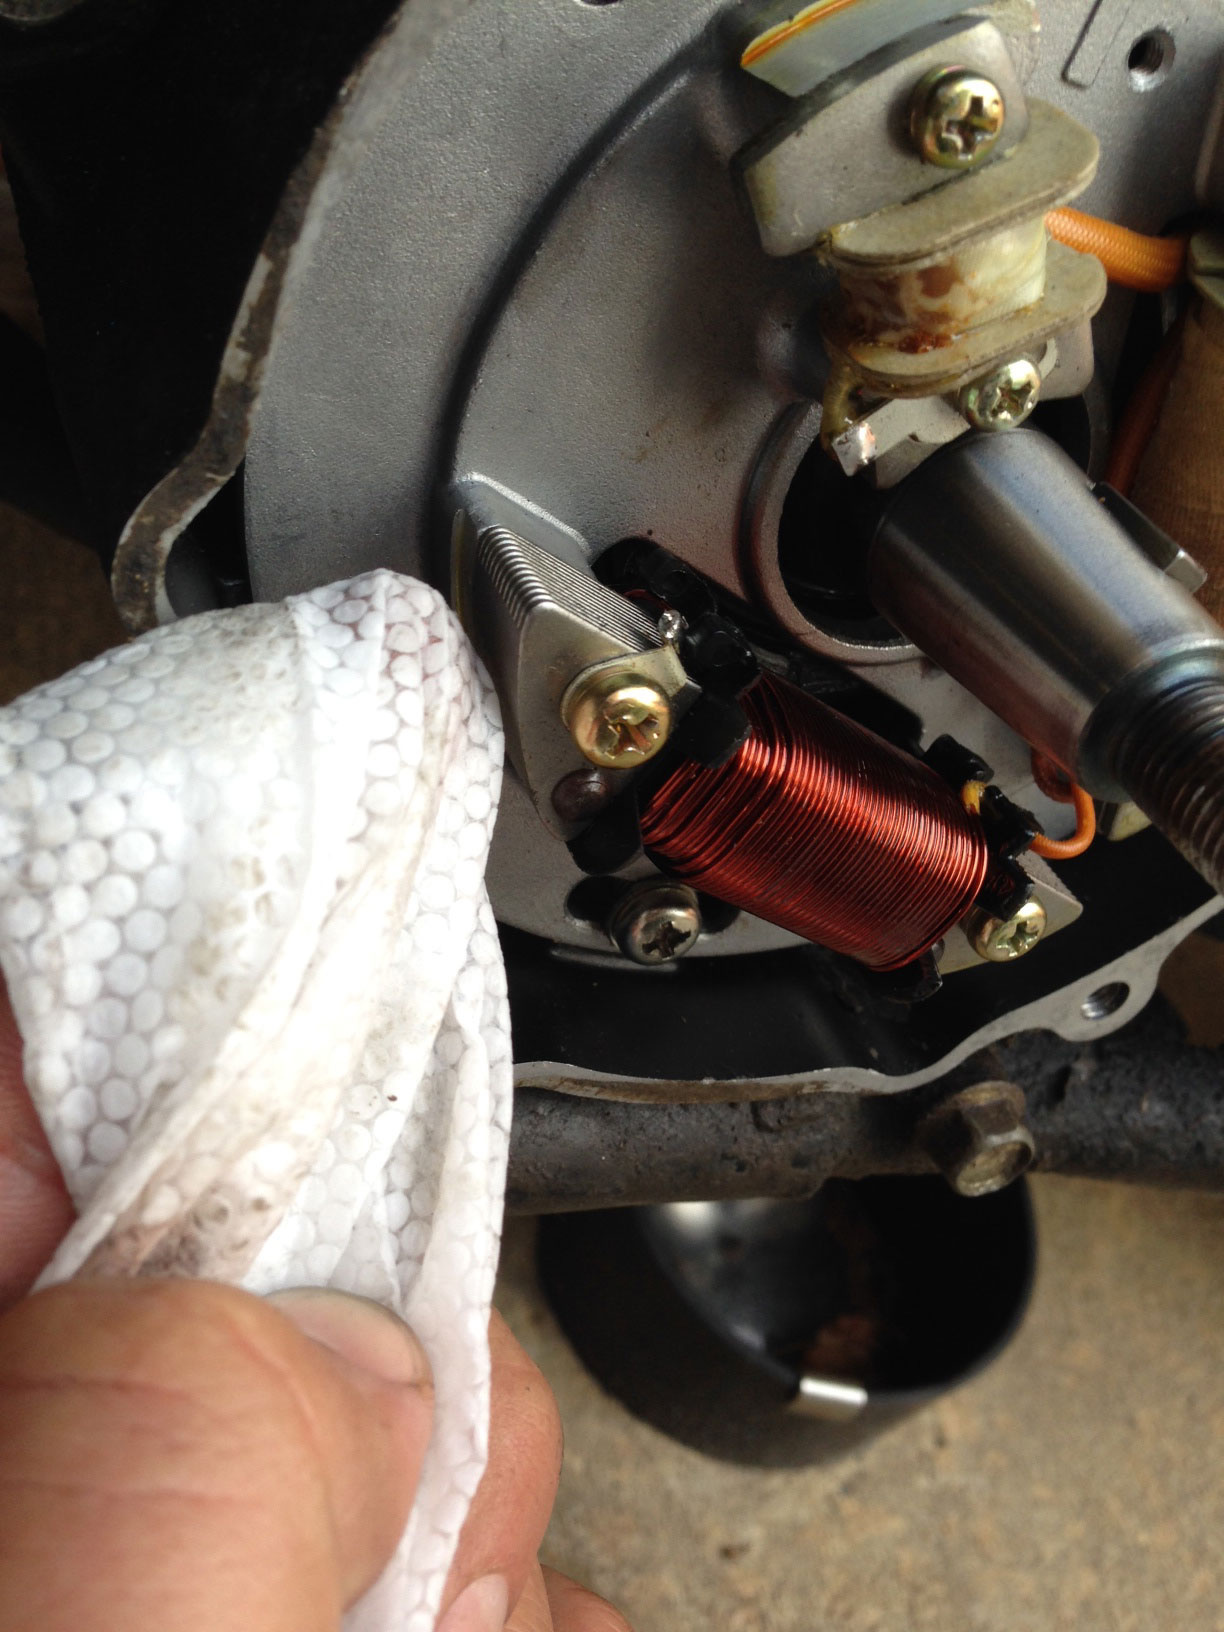
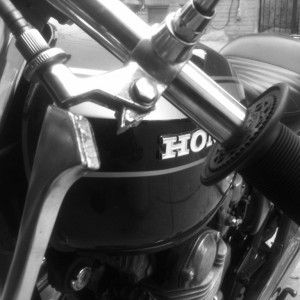
Magneto side crank seal
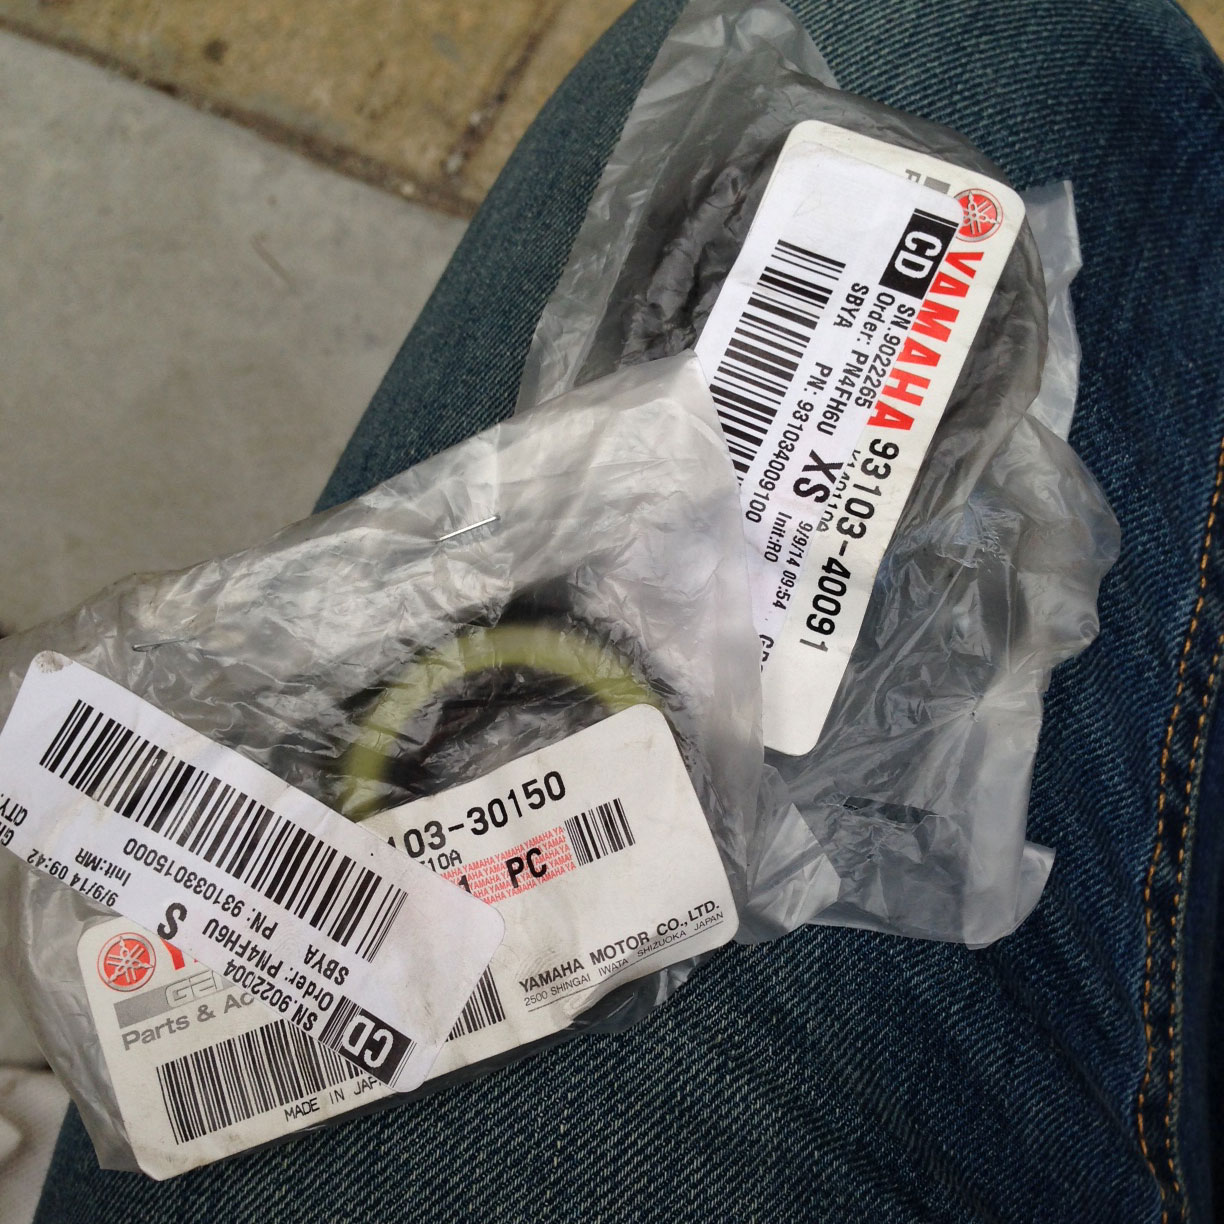
- Use OEM yamaha seals. Get them from BikeBandit.com
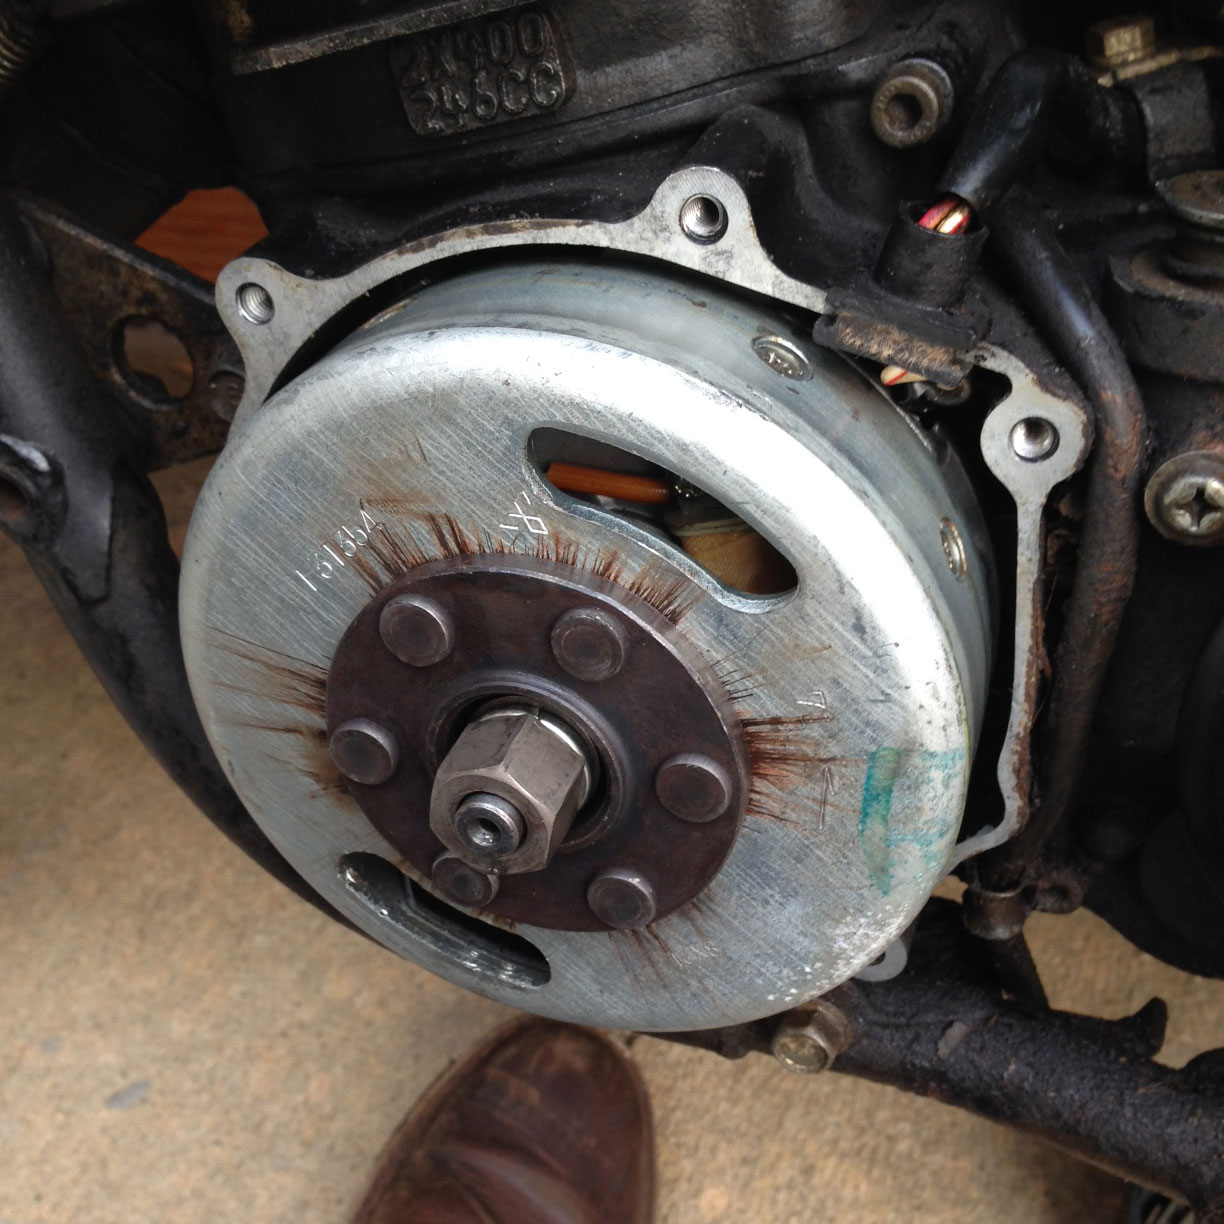
- Pull the cover off
- Bolt will be a 19mm. Unless it’s recently been loosened at some point, absolutely no way you’re getting it off without an air compressor set at above 80psi.
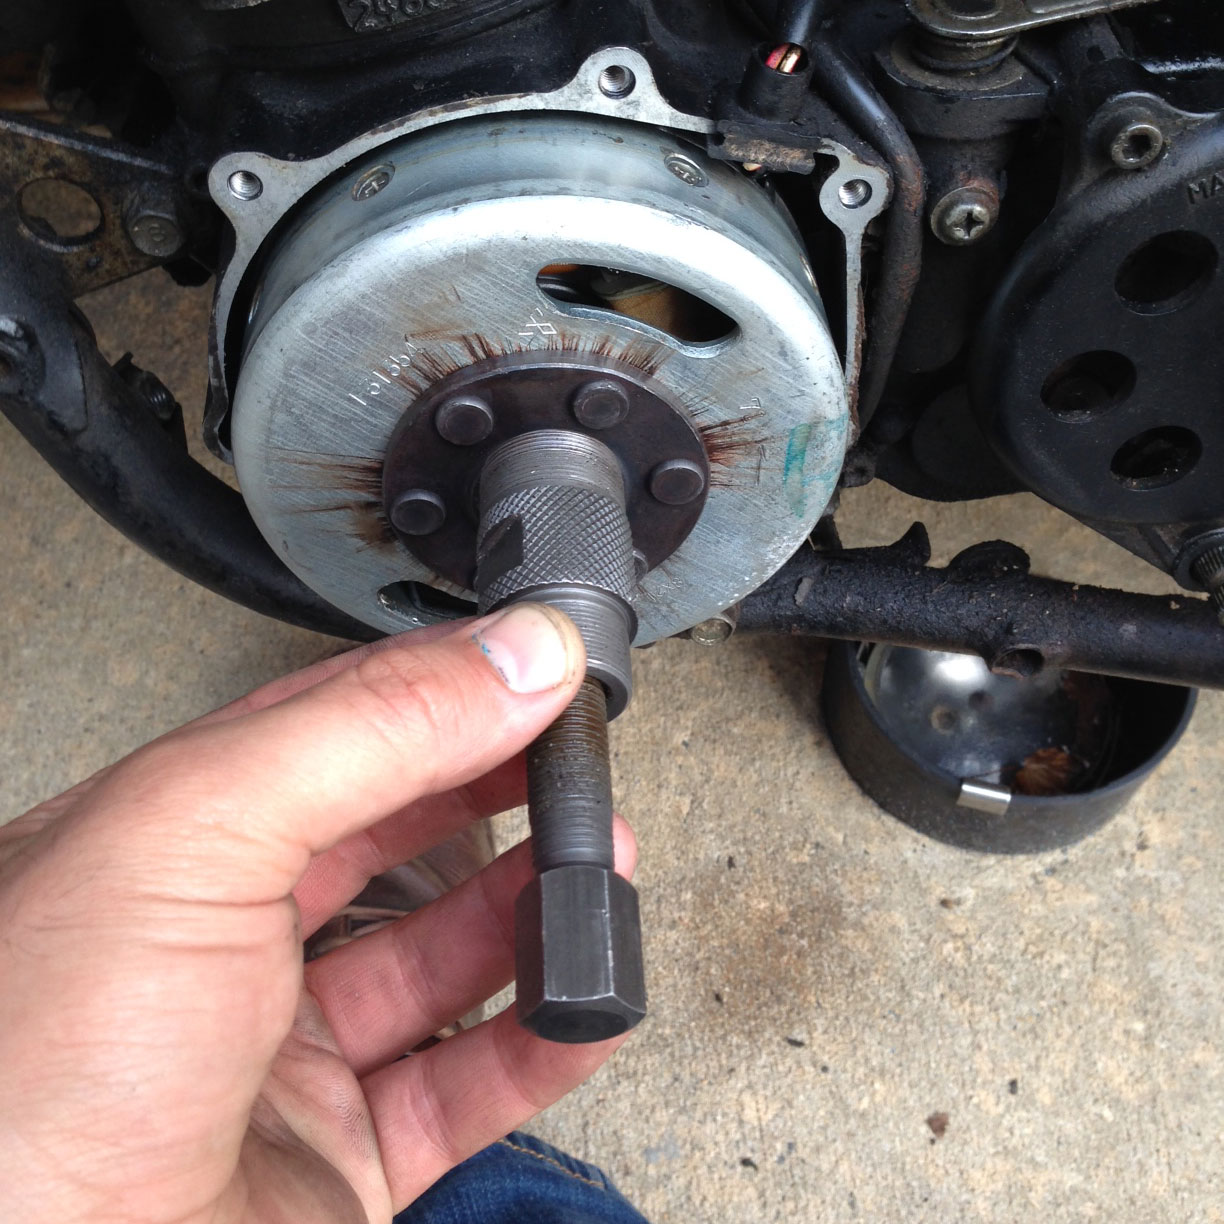
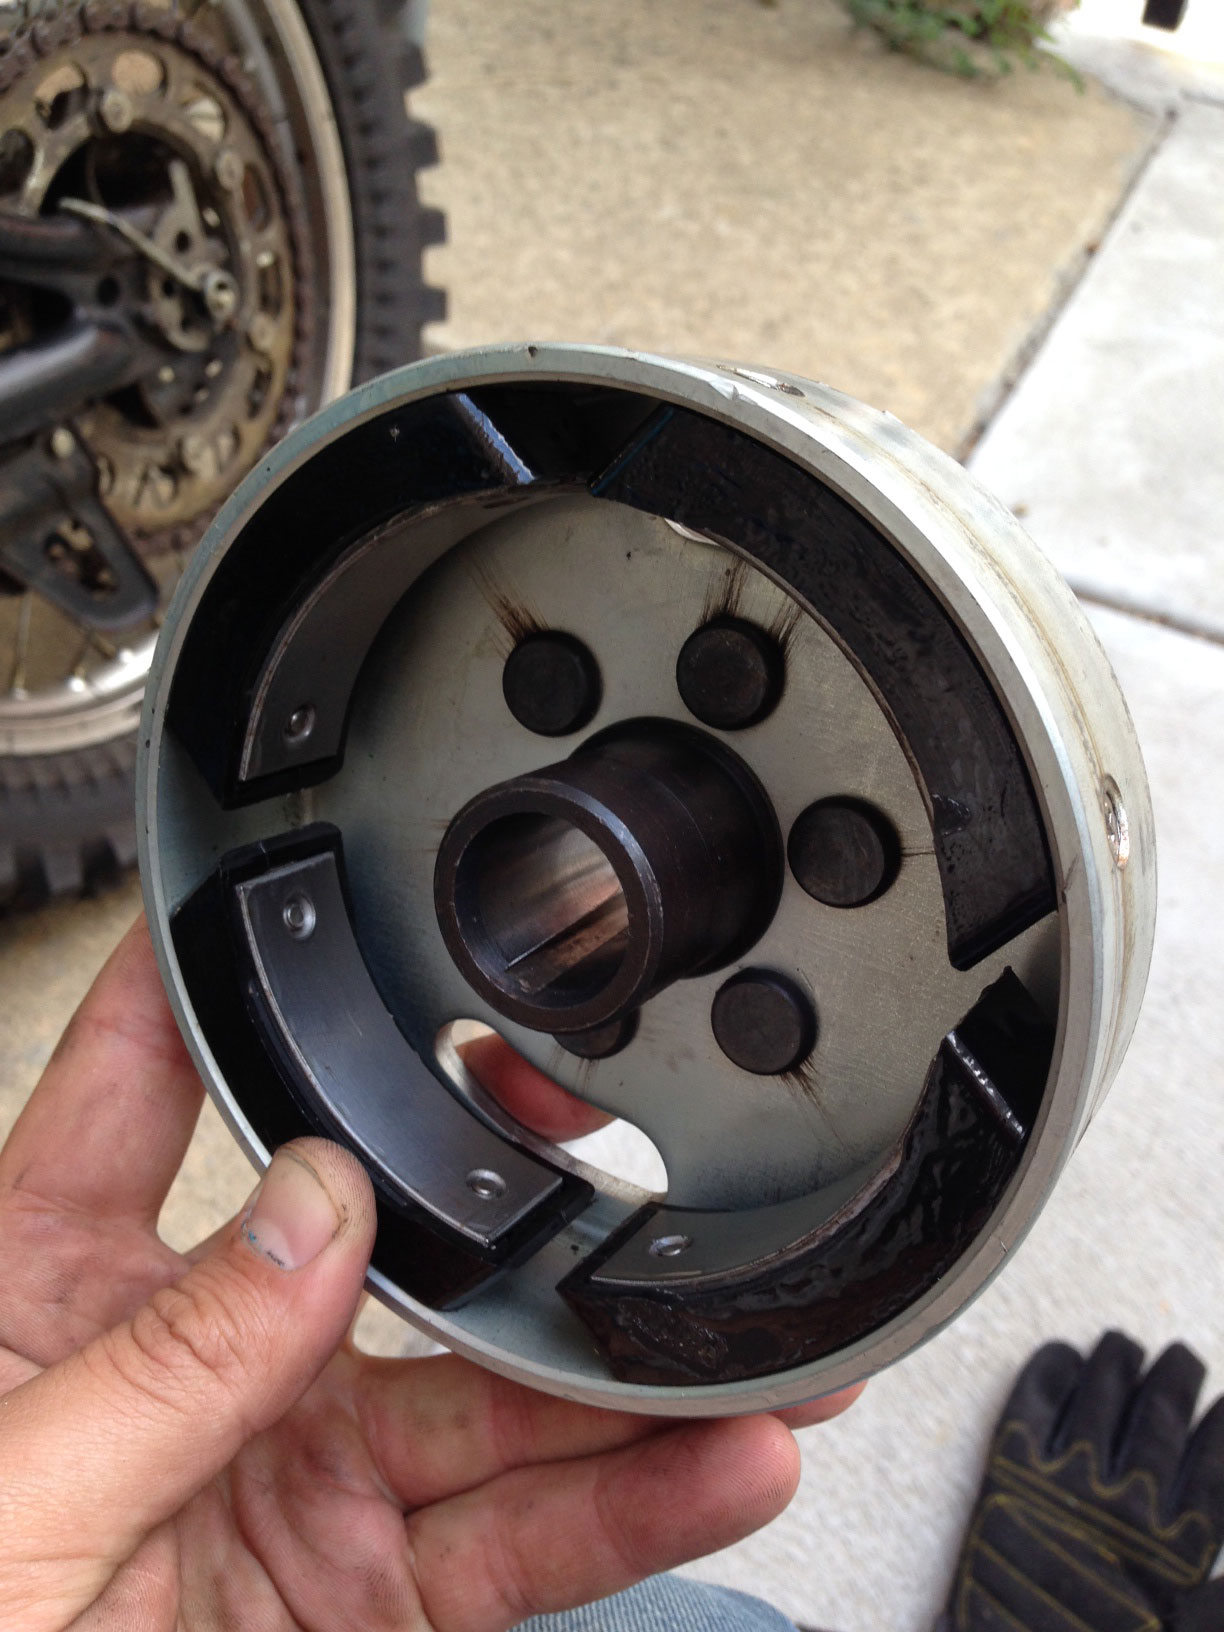
- Once that bolt is off, screw on the yamaha magneto puller tool
- Tighten it on there and then start to use the 2 wrenches to pop the magneto off. If this is the first time your magneto is coming off, be prepared to feel like you’re going to strip threads, or break something. Every time that it’s the first time i’m blowing off a magneto that’s been stuck on there for 30 years, it’s blows off with a crazy loud noise. Shit is seriously scary.
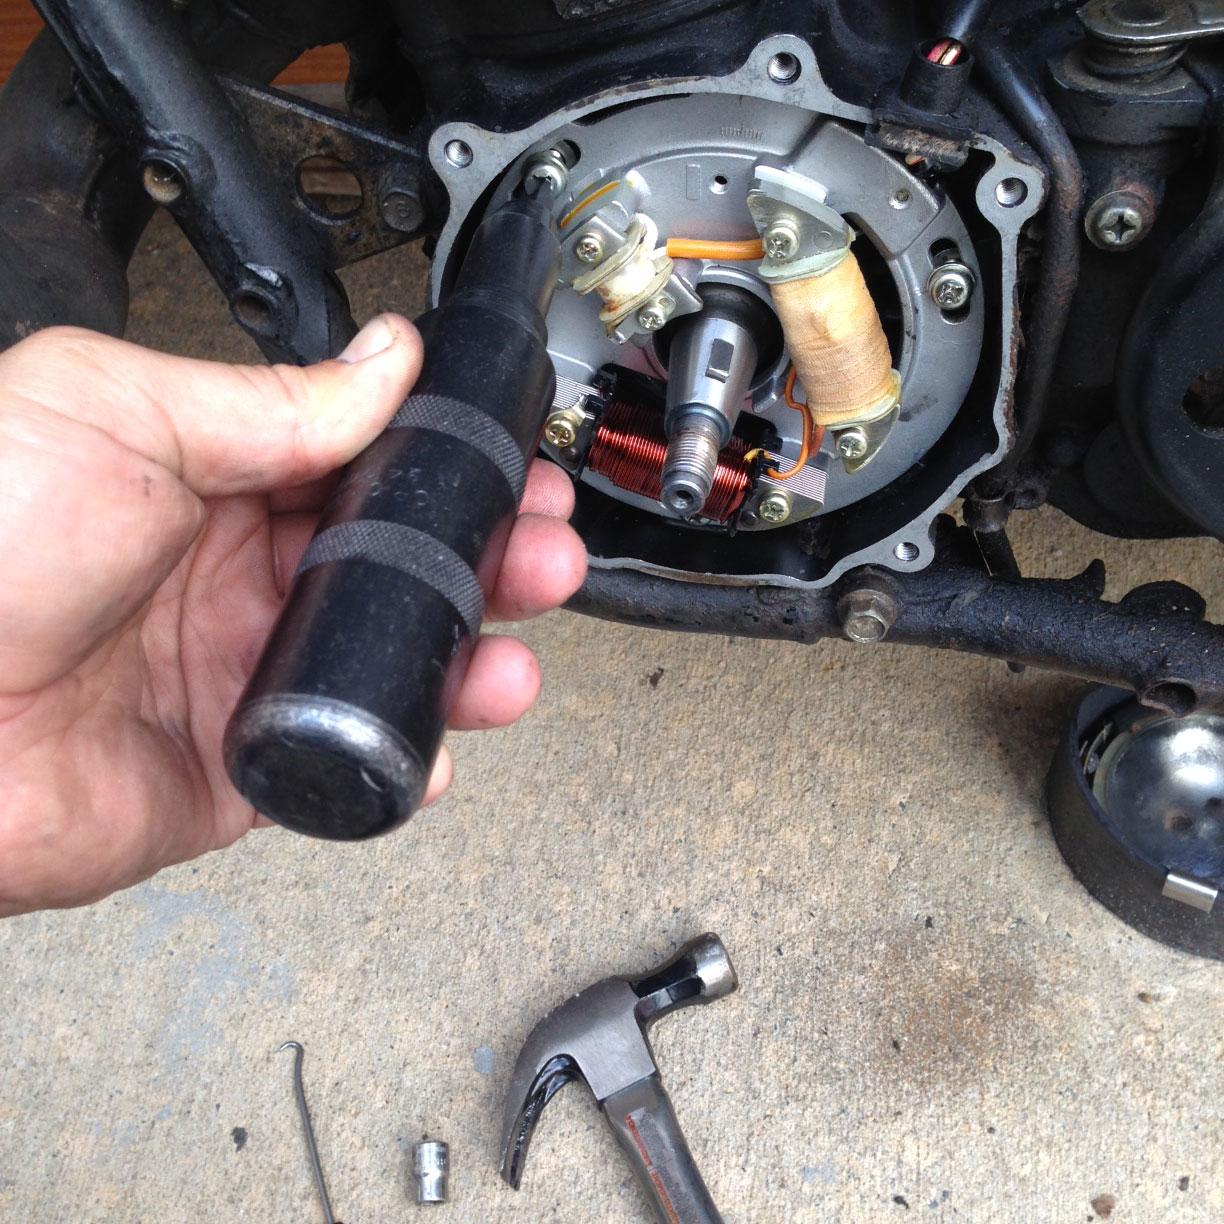
- Use an impact driver to get the stator screws out.
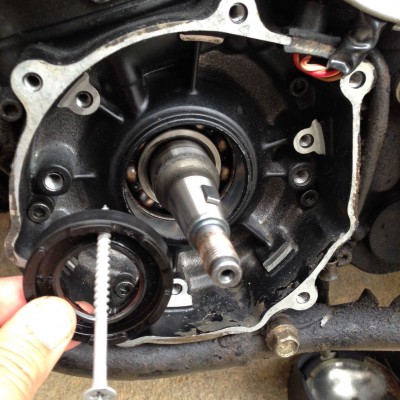
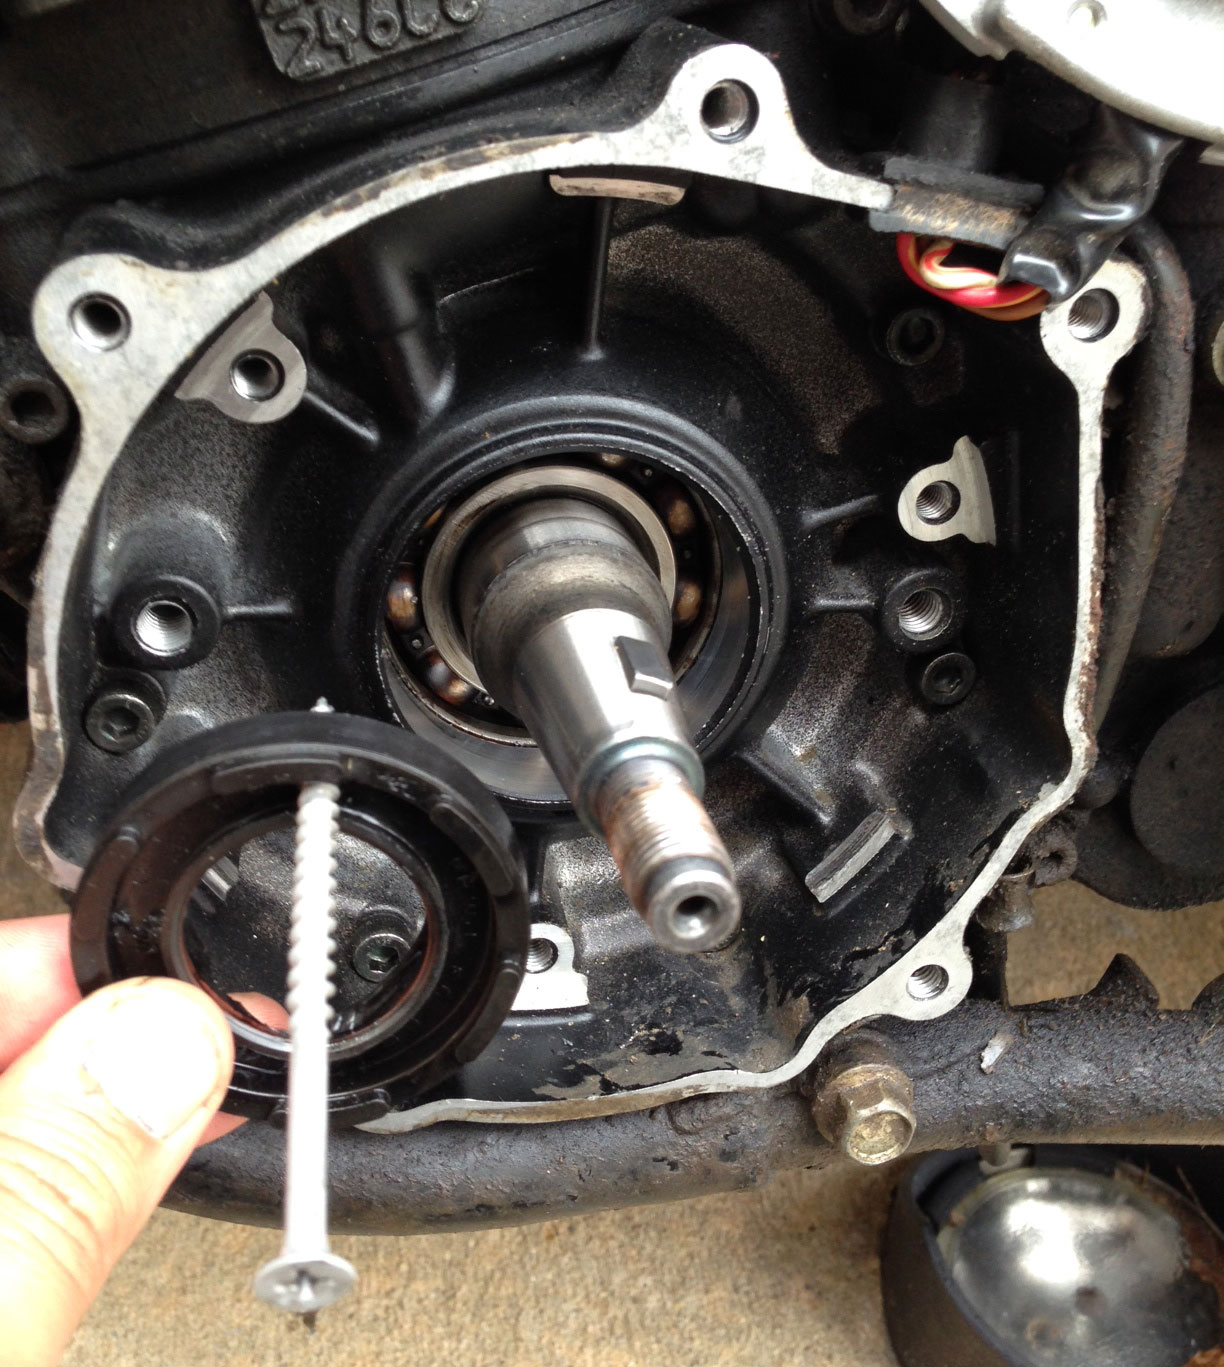
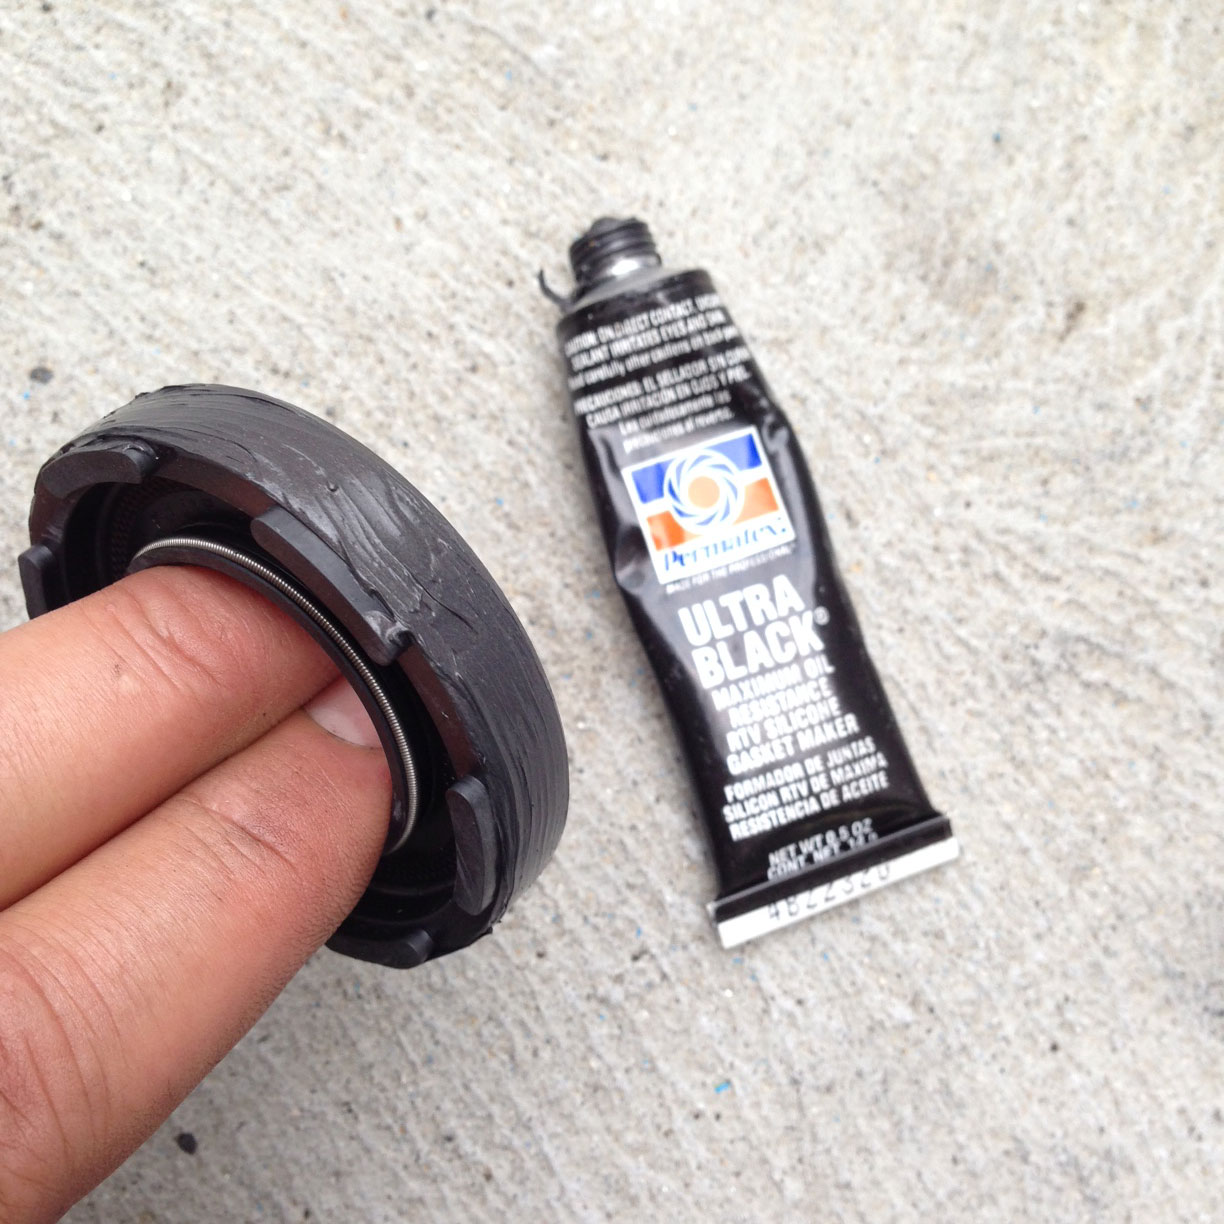
- Then take a drywall screw and hammer it gently into the old seal. Only poke it through a tiny tiny bit. Then screw it in only until it grabs. Then use a hammer to pry, and pop out the old seal. Side note – if you can get the seal out with a pick instead of a drywall screw, do it. Good luck though.
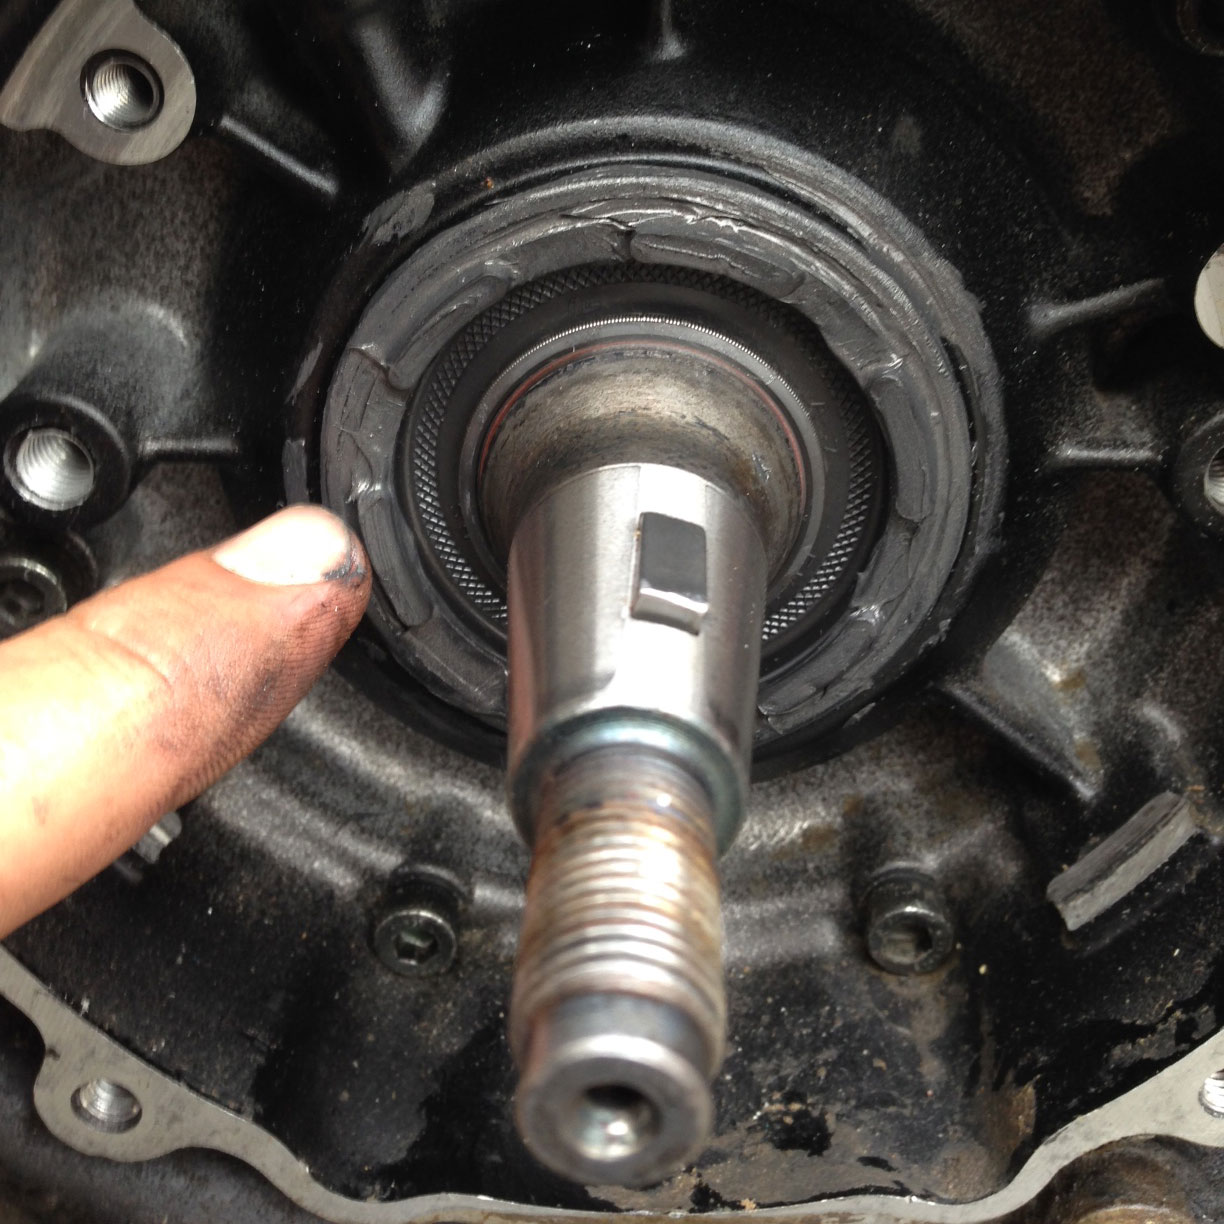
- Wipe everything dry with alcohol. Then, since this side is prone to air leaks, I use Black Gasket sealer on the outside of the seal. Never gotten air leaks by using this method.
- Push the seal in gently. Tap it in gently if you have to. Also, once the seal is pushed all the way in, put a thin coating of gasket sealer around the outer edge. Someone once recommended this. Works for me. Again, gasket sealer is up for debate but I like it on things that are prone to air leaks.
- Since it’s all apart, wipe the contact areas of the stator and magneto clean with a rag and alcohol.
- You’re done this side. Reassemble. Important note – when you put the magneto back on make sure you tap it on super hard with a rubber mallet. It needs to sit all the way into the woodruff key and the bolt needs to be tight as shit or the woodruff key will sheer off.
- Last note. These seals are directional. So put them in the right way which is little round spring facing into the combustion chamber. My images show it going in backwards, sorry. However. I put them in backwards in my IT and never had a problem … actually think it makes more sense to put them in backwards so the little spring can’t fall into the combustion chamber. I dunno, it’s your call.
Clutch side crank seal
- Pull the cover off
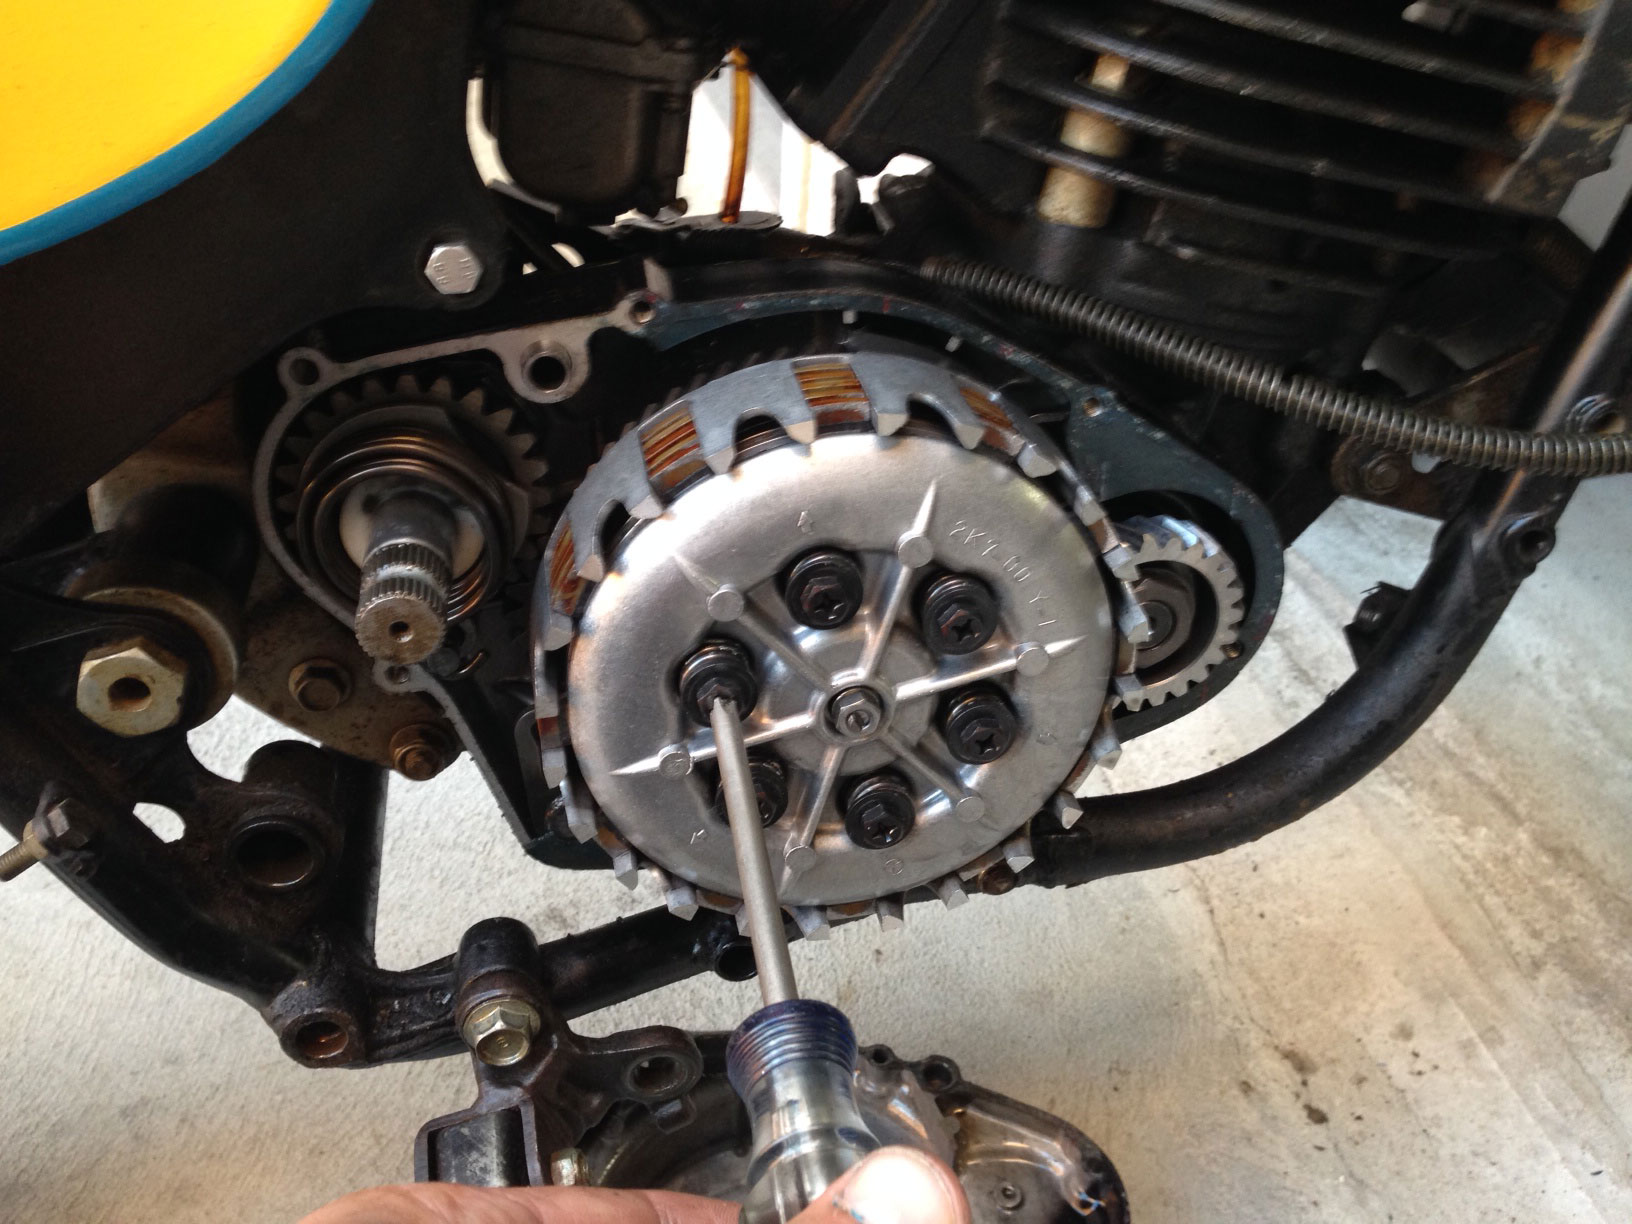
- Undo the clutch spring bolts
- Those 2 bolts I’m pointing to will definitely not come off unless you have an air compressor set up. Maybe if you have a clutch basket holder. Still they prob won’t come off.
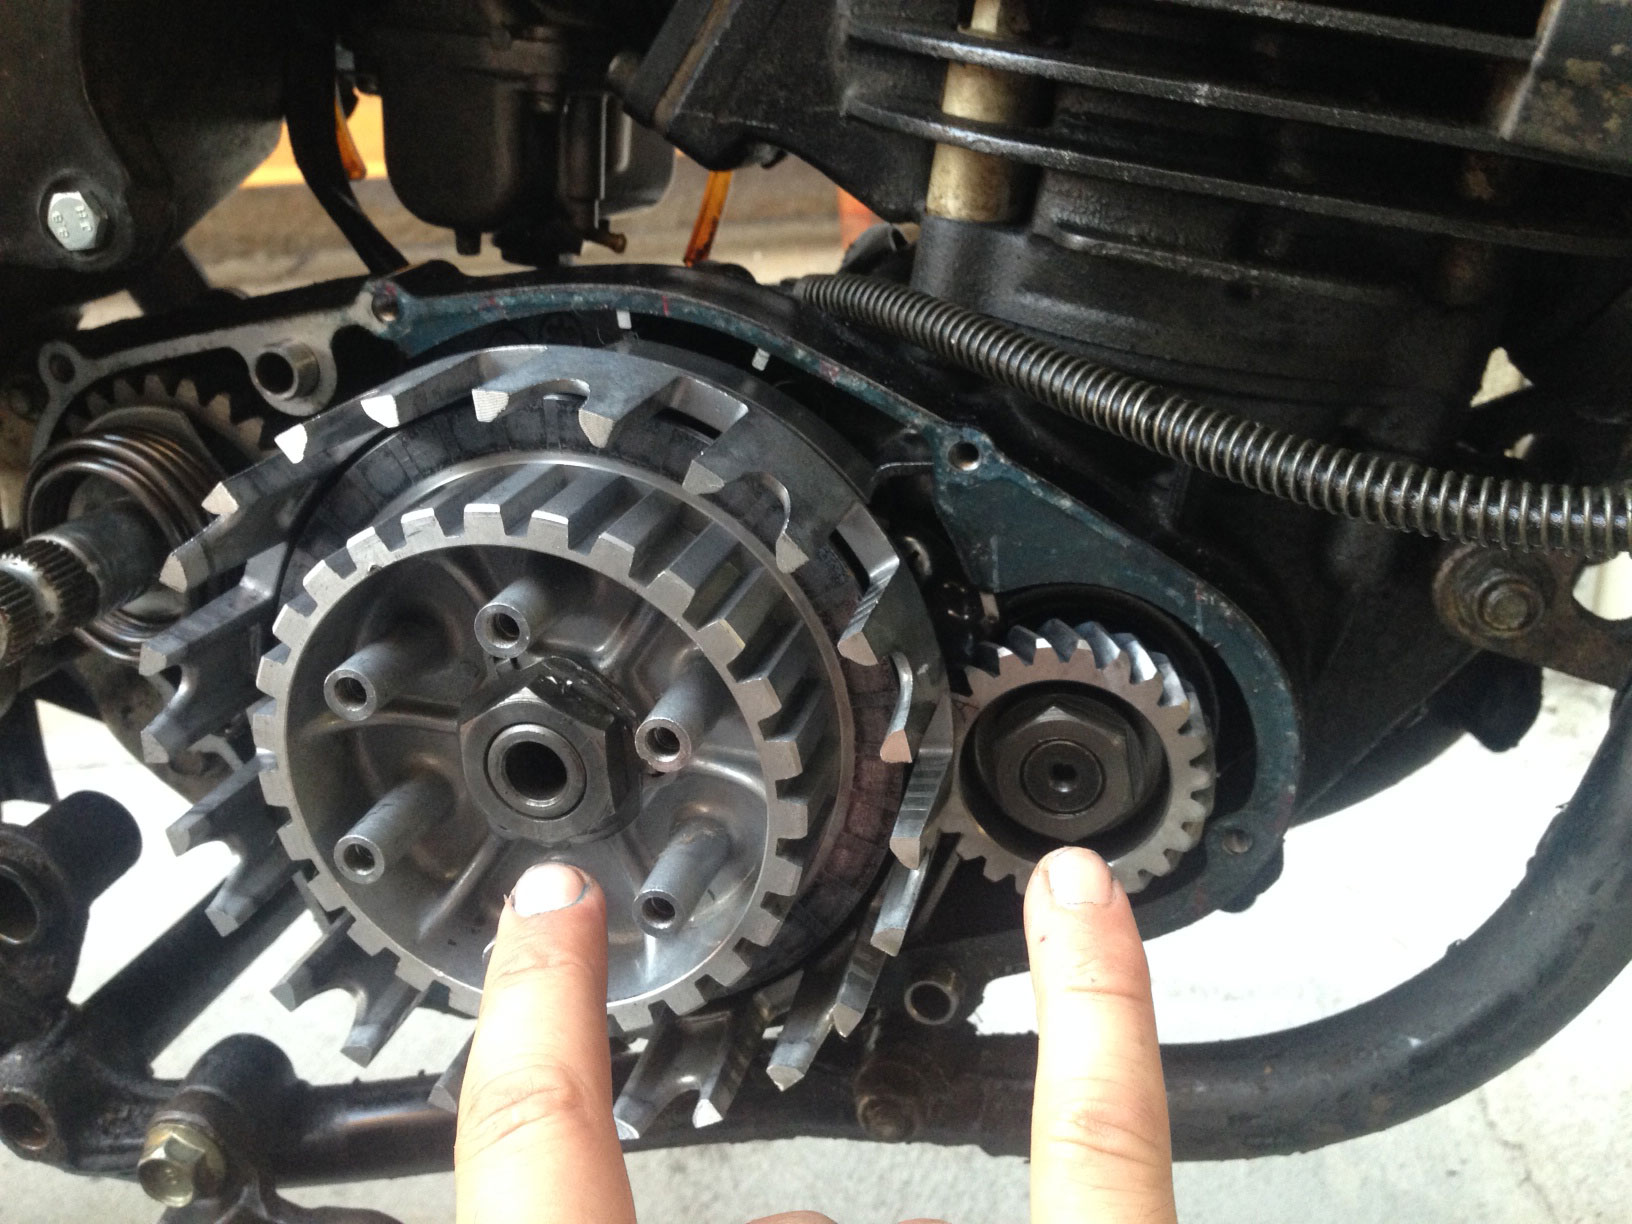
- Once you do get them off, it’s easy. Pull off the clutch, and pull off the primary gear. Take a photo to ensure proper reassembly if you need to before pulling shit all apart.
- Popping the seal out on this side is the same as the other side you just did
- Wipe everything clean with alcohol, and put this seal in dry. No gasket sealer.
- Reassemble. Make sure you tighten those 2 big bolts back to the torque spec or at least make them tight as shit. Then… Drink a beer.
42 responses to “Replace Yamaha 2 stroke crank seals”
Leave a Reply
You must be logged in to post a comment.
Random
Blast
From Past
Published - Oct 27, 2012
Fucking leaves
Couple leaves caught me off guard and went down. Broke clutch perch. So… Watch out for those leaves. I’m always looking for them and they still got me. Fuckers. Low speed… so all is good.
Good write up. I’m about to do this to my DT400 and my DT1 250. replacing crank seals are a must on the old 2Ts, Thats been the number 1 failure I’ve had on any of my old bikes.
Ed,
Nice article and explanation.
The rule of thumb / rationale for seal direction is that the spring (or open) side should face the cavity that will see positive pressure (the fluid you want to contain). The design of the lip is such that when pressure builds on the spring side it forces the seal lip even tighter against the shaft.
While it’s up to debate, it’s widely understood that there is NEVER an appropriate use of RTV on a motorcycle. It will damage things quickly if it gets into your oiling system. If you are trying to retain the seal, use LocTite bearing and seal retainer. If you are trying to improve the seal and hold it in place, use an anaerobic sealer such as LocTite 518 or 520.
Jason
I can’t agree with putting the seal in backwards and with sealant. I prefer to just make sure everything is super clean and push in the new seals dry. Should also make a note that you put it in backwards so that other people reading it know.
I also think its easier and less risk of damaging anything to pull the old seal with a small pick. You can usually use a hook pick and pull the seal out without damaging bearing behind it or the seal seat.
you’re so gay adam.
you like to push it in dry.
I’m pretty sure that gays use lube. It’s rapists that like to push it in dry.
I’m not here to break up the talk about gays, blowing out a seal, and lube, but I’m confused by the RTV comment, Jason.
Maybe I’m not understanding your meaning but all of the factory manuals that I’ve read recommend sealing crankcase halves with RTV (Threebond, Yamabond, Hondabond, Permatex Ultra Gray, Right Stuff), also on 4 strokes, cam plugs, rubber style valve cover gaskets get sealed with RTV in certain areas, just to name a few things.
What do you use in these situations?
Any seal or gasket that’s prone to an air leak… I’m sticking with using a thin coating of permatek ultra black gasket sealer regardless of what anyone says or thinks. It eliminates any potential that you’re going to get an air leak IMO.
Any seal or gasket that comes in contact with oil… goes on dry.
Any head gasket or base gasket… Spray with copper coat, then put on.
They’re the methods I decided on after trying numerous different things.
Mike,
The RTV recommended in manuals (ThreeBond 1104, Hondabond, Yamabond, etc) is non-hardening (and may not be silicone based, but I’m unsure). It’s run of the mill silicone RTV that should not be used on bikes. It cures when exposed to air and turns into hard little rubber nubs that can get lodged in oil passages.
Anaerobic sealers only cure in the absence of air (such as mating surfaces on flanges for covers and case halves). Any extra that protrudes from the joint remains in a liquid, jelly-like state that will dissolve in oil and not clog passages.
I have personally witnessed and repaired motor failures from silicone RTV use.
Jason
Hi! You don’t mention it; so I’m assuming that none of the three nuts are left-hand threads.
I’m only working on an old DT50MX but it’s showing exactly the symptoms described. If I crack open the throttle it keeps on revving and would probably self destruct if I didn’t kill it!
Great post thanks! full of useful information I can teach on to my students
I’m pretty sure that gays use lube. It’s rapists that like to push it in dry.
seal is in the wrong way has to go other way to stop pressure from pushing out , with a rubber cased seal no sealer is required thats why they rubber coat them, in the case of a metal case seal sealer is ok to use and you should use a non hardening sealer as previous comment the spring clamps harder around seal when under pressure , how it is shown seal will blow out eventually causing bike to run like crap if seal was in that way originally or by a previous owner it has been done wrong
I have a Polaris 2 stroke which has a dry Pvt. Clutch on left side much like a snowmobile. My question is should I put sealer on my clutch side seal and the other side with stator etc. or just one of them. Which one? Thanks
Sorry for double post but I will have rubber coated seals so I’m thinking I should just slip them in dry with flat out and the spring side toward crank.
Have just got my DT175C back on the road & it’s drinking gearbox oil so I’m going to replace the R/H crankshaft seal. Nice instructions. Cheers from the UK
Nice “how to article” just found that my DT175C is drinking gearbox oil so I’ve got new crank seals,& am going to make a start this evening. Cheers from sunny England UK!
So I followed this guide to a tee (minus RTV), started the bike up and it was still running pretty crappy. Oil seemed to be leaking from the left side as well. Put it away for the night and the next morning all of the oil had leaked out, seemingly from the left side cover. I don’t think there should be any oil here, so did I just completely fuck up both seals? It seems like the oil would have to leak through the right side seal and then out of the left side seal in order to leak where I’m seeing it.
Thinking maybe I didn’t push the seals in far enough. Are they supposed to be against the bearing, or just flush with the housing around the outside?
I have had 30 yrs experience with 2 stroke engines, The left seal has 100% for sure been put in the wrong way around and by the looks of your post it was already like that and you just copied the way it came out, No need for any extra sealing compounds on these seals, Threebond 1215 is recommended by Suzuki Honda Kawasaki Yamaha, But it should only be applied sparingly.
Back in 1974 I had a 1972 or 3 Yamaha 175 Enduro, I believed to have been DT175C mentioned above. I was driving down Highway 50 one day when the left seal popped out on it’s own. I put a new seal in it and it popped out again. The Yamaha dealer sold be a seal retainer that fit over the seal and was screwed to the case. It still ran, put not okay. at high rpms it would kind of pop and miss, the same sound as the seal popping out. Never ran good again. Good luck with that one Greg! Actually hope you succeed. The DT175C is just a funny animal. My got stolen by a North Sacramento punk. I missed that bike for a long time. Greg does yours have the green tank?
Does anyone know what Walruses and tupperware have in common? They both have tight seals. Turning a seal around may make some sense since the lip on the seal would likely contact the shaft at a new spot in case the shaft has a wear groove. The only thing that may contradict that goes back to the basics of a 2 stroke. Negative pressure pulls fuel and air into the crankcase while the piston is traveling up & pushes the fuel air out through the transfer ports into the combustion chamber when the piston is traveling down. With the seal put in backwards, it would would stand up better to negative pressure and visa versa for positive pressure. Maybe in Greg’s situation with the seal on the dry side put in back ass backwards, it’s acting like a pump with 2 opposing check valves. It pull in oil from the wet side on the up stroke & pushes it out the dry side on the down stroke. I thinks someone at yamaha made a mistake, otherwise comments wouldn’t be coming for over years. Maybe this disccusion will go on for years to come. I think the guy that started this bs was dislexic. Did he work a Hamaya or Siralop? I didn’t get the engine brand.
I have a 1977 Yamaha YZ80 that I just noticed is starting to drip from the bottom of the left (generator) side crankcase cover. Is this most likely a bad crankshaft seal? Are the drips I see (kind of oily-looking)the fuel from the crankcase or would it be transmission oil?
I just got a dual shock Yamaha 80 the cylinder says 79cc how do I figure out if its a 2 or 4 stroke? Thanks in advance.
Do you need to replace the gasket seals as well? Or can I reuse them to get to the crank seals?
Nice right up Ed. I work on a lot of 2 strokes. Cranks seals are very important, if you cannot get to idle or run smooth after a good carb cleaning more than likely the seal. I always put a thin film of yamabond or rightstuff on outer part of seals. This helps to lubricate seal so it does not chafe outer rubber on seals! I then wipe down outside of seal excess sealer after installed. Silicone should not be on inside of seal because it is wiping off excess as you are pushing into case. Larger 2 strokes you have to split cases because of a rubber rib to keep them from pushing out(street bikes and snowmobiles). This requires splitting cases. Reassembly requires yamabond or rightstuff. But with any motor very thin film of sealer is the key. Always when tearing apart take note of the way parts were removed and reassemble. If something does not seem correct google. Most crank seals are double lip seals, if they are smooth on one side smooth side will face outside of motor. Best way to find air leak is block off all ports and leak down check with 5 psig. I love bringing old 2 strokes back to life, happy wrenching!
Which way do i install the clutch side crank seal? I have the same seal shown in your pictures, the one side has a gold ring and the other is black with numbers. Do i install the seal wit the gold ring facing the crankshaft or the other way around number side facing the crankshaft?
1978 dt175 new piston stock, new liner, crank seals new,vent tube to crankcase free, reed valves and assembly new, new carbarator,exhaust system removed and cleaned with heat.
These are the things we have done and still will not run over 5000rpm ,no idle with air filter cover on. Take air filter cover off 6000 rpm but air is coming out of filter.
HELP phone # 937-232-0064
Carlblavine@aol.com
Great write up! Exactly what I’ve been trying to solve on my 79 yz400 resto.. Would lean out and run high rpm erratically, and motor oil was in crankshaft well. 2 crank seals and a countrrshaft seal going in next week.. Thank You!
JB, Phoenix, AZ
This did help allot, I come back to it to the site many times to familiarize myself with what forgot.
Thanks
Just saying, since the bottom end sees negative and positive pressure during a cycle, it doesn’t really matter with regard to seal orientation. Negative pressure when drawing in charge (most critical if you ask me) and positive pressure when forcing the charge into the cylinder from the bottom end. SO, in my opinion, dude/OP installed them the right way if you’re gonna tout the whole pressure to force the seal against the shaft. The intake into the bottom end (negative pressure) is what’s gonna throw off the mixture, so… not sure where the disagreement is.
If you wanna be super thorough, don’t get OEM single lipped seals. Get double lipped seals from a bearing/seal distributor – then it doesn’t matter which direction you install them if you’re worried about seal orientation and pressures. Often times domestic Viton is available instead of standard/import Nitrile which is what you’ll get from Fleabay. Do you really want “OEM” rubber in your bike anyway? I know I want the freshest rubber I can get regardless of where it comes from.
Lastly, DON’T USE RTV ON SEALS!!! Drive them in dry with a lubricated lip and make sure your sealing shaft isn’t damaged/pitted. If it is, you can let the seal sit further out if the assembly allows for it to ride on an un-corroded portion of the crank. Remove them however you want so long as you don’t contaminate your bottom end.
I’m not an old timer, but I know a thing or two, and this is how I do it.
Interesting. I raced IT’s in the 80’s successfully in enduro events and even Trask. Worked on them a lot. Full tear downs to simple maintenance. Basically bullet proof. Even the smaller ones in the wide open Oregon desert event. But at my age I find it’s nice to reinforce my thinking on how to do things. Wish I could find all my old tools I made specifically for them. Great site.
Quick question is the 19mm nut regular or reverse threads? left/right? I need to pick one of those magneto pullers up.
Thanks, Nice write up, thanks for taking the time to put it together..
Hey guys I own a 1973 Yamaha ct3 that needs new seals. Having trouble finding them where I live in montana. If anyone has any leads or insight that would be super appreciated as so far all I’m finding is that they’re discontinued. Thanks in advance
Hi I have a 1976 YZ 80 Yamaha
Replaced the double sided crank seal twice.
Seal rides on a good collar.
Bike still blows a ton of smoke and transmission oil is still coming out the exhaust,
Washed exhaust, out of old oil as well.
Is it possible that the transmission oil is entering
the engine crankcase from between the crankcases
interface?
Crank bearings don’t wobble either.
And bike runs real good with a good solid idle.
Cheers.
crankcase
I have a 1974 dt 250 , bought it in 1978 . Just used your guidance here to install clutch side crank seal . All went well except after I put it in I realized I had not tried to line up the spaced hard rubber tabs on the inner side of seal with the bearings that were visible inside the motor . Will it make a difference or did I goof up . This article did not mention that .
FYI I am talking about those tabs on the seal shown in your picture with the drywall screws in the seal , looks like they might correlate with the voids between the ball bearings inside the case
1974 DT250A, did a rebulid last year, took me a whhile to get information on the correct orientation of the crank seals, as someone mentioned here the mag side seal in the photos is the wrong way around, the raised edges face the main bearing on the mag side and clutch side, there is also an “O” ring behind the gear on the clutch side that gets compressed to stop gearbox oil travelling along the shaft and gasses escaping. Incidently i didn’t renew that “O” ring and the crank case has filled with oil while standing for a few months. “DOH”
Good feed back and information on here so thanks folks
i am doing a 74 dt 250A right now and am putting the newer type crank seals i got from bike buzzerd
there good seals left hand seal 62xod 30id 10w
double lip. right hand side 62od 40id 8w just was going
to say the cuped side goes toward bearings and i smear
a very light coat of black ultra rtv around seal as i have always done. never had a problem i also put a notch with dimond bur on outer cup that butts up against bearing and i line up with lube holes that funnel down on bearings this alows better lubrication to the bearings and yes change the o-ring 93210-24235 the 73 and 74 share the same seal 75 and up take a diffrent seal that is still avaluable for sale at patzilla hope this helps sombody building one of these fine machines
Very fine well written tech article. Makes for a good read for the “newbie” or done it a million times folks. Also, refreshing to see a polite exchange of knowledge.
Fasternu0
I have a CT1 and while try to get it to start after kicking it 30 + times with no luck , I was standing there and noticed oil dripping from the left( ignition) side case. What’s up, is that mean I need to replace the crank seal???
I am currently restoring a 1988 Yamaha 480 Phazer snowmobile. Both crank seals were destroyed. The lips with the spring that goes around the crank were both ripped off and the springs were just sitting there. For the life of me, I can’t imagine what would cause this. Also, as for the orientation debate, The 2 seals, mag and PTO sides, were both in “backwards”. Now I have another Phazer engine here and upon inspection, those seals are in the “correct” way. Sooo, now I’m confused on which way to install the new ones. I kinda like the idea of the double lip design but have no clue where to look for those. Any help would be appreciated.
Very helpful
Thanks for taking the time
Steel McQueen